If you have ever worked with B2B integration in the automotive world, you already know that OFTP2 is not just another file transfer protocol you can shrug off. It sits at the core of how manufacturers, suppliers, and logistics partners exchange EDI messages, engineering data, and shipping documents every single day. And once your list of trading partners grows past a handful, keeping track of who connects how, with which certificates, over which protocol, quickly turns into its own kind of headache.
This is where Boomi’s Trading Partner Management comes into the picture. Instead of hard-coding connection details into every process or juggling scattered configuration files, Boomi lets you model each partner as a first-class object: their communication method, security settings, document standards, and routing rules all live in one place. Pair that with native OFTP2 support, and you get a setup where onboarding a new partner or troubleshooting a failed transfer becomes a matter of checking a clear, structured configuration rather than digging through logs and guesswork. In this post, we will walk through how Boomi handles Trading Partner Management and how OFTP2 fits into that model. Before we get into the technical details and actual configuration, it helps to understand why this combination matters and what problems it is actually solving.
Project prerequisites & configuration #
Before we start, we need to make sure the OFTP2 port is exposed on the runtime. If you already have a Boomi Atom running in Docker, you will just need to add the port mapping to your existing setup. If you are starting from scratch and do not have a configuration yet, the docker-compose file below can be used as a baseline for your Boomi Atom.
name: "BoomiAtom-Local"
version: "3.8"

services:
  atom:
    container_name: boomi_atom-container
    image: boomi/atom:5.5.1
    volumes:
      - ./boomi_docker:/mnt/boomi:Z
    ports:
      - "9090:9090"
      - "5002:5002"
      - "3305:3305"
      - "6619:6619"
    hostname: "boomi-local-atom-docker"
    environment:
      INSTALL_TOKEN: "your-atom-installation-token"
      BOOMI_ATOMNAME: "boomi-local-atom-docker"
      ATOM_LOCALHOSTID: "boomi-local-atom-docker"
    networks:
      - boomi-net

networks:
  boomi-net:
    name: boominet
    driver: bridge
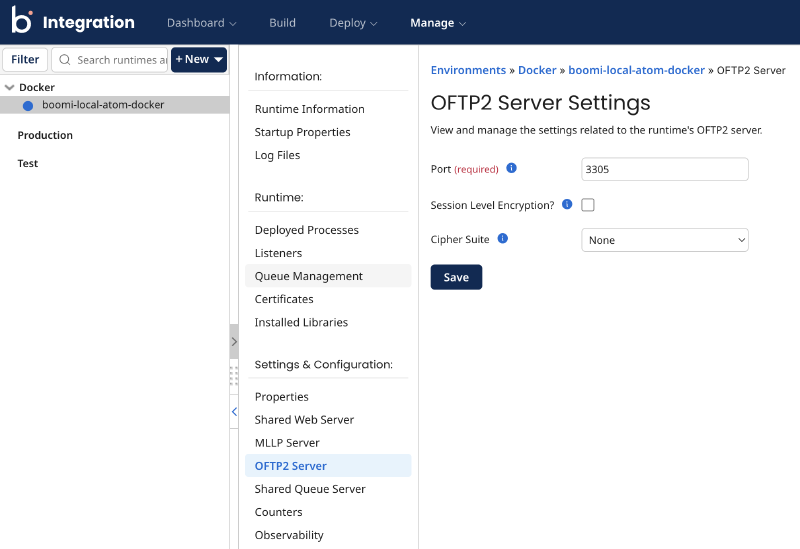
Once the installation is complete, the next step is to enable the OFTP2 Server on your runtime. For testing purposes, we will use port 3305 and skip the security options for now, since our goal at this stage is simply to get a working connection up and running. Then click “Save” and restart the OFTP2 plugin.
Once the OFTP2 server has started, you will not notice anything unusual in the Boomi Atom backend at first. Everything appears to be running fine. The problem only surfaces later: after you deploy an OFTP2 integration and run your first test, the Atom logs will start showing errors about a missing BouncyCastle library.
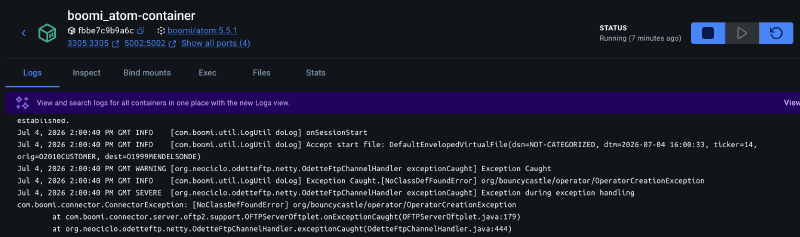
BouncyCastle is the cryptographic library OFTP2 relies on, so without it the integration simply cannot complete the handshake. The good news is that this is an easy fix, and I will walk you through it step by step so you do not have to figure it out on your own.
Head into Runtime Management and open the Properties of your runtime. Switch to the Advanced tab and add the line below to your configuration.
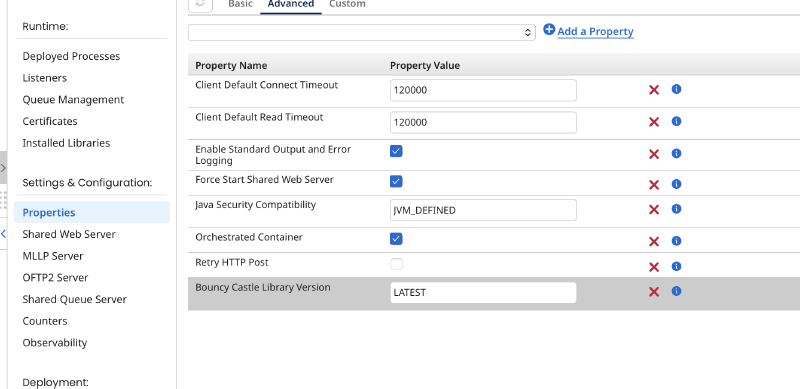
Once you save this change, the Atom will restart automatically, and BouncyCastle will be loaded on startup. After the restart, your OFTP2 integration should run without the missing library error.
Mendelson OFTP2 Partner Configuration #
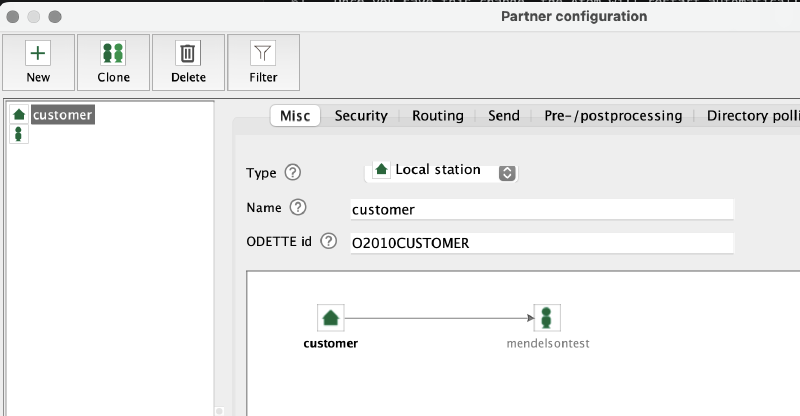
In the Mendelson OFTP2 application, we need to define two entities: a local station and a partner. The local station represents our own side of the exchange (in this scenario, our customer), while the partner definition points to the remote system we want to connect to, which in this case is Boomi. To keep the roles clear:
- Local Station: Our Customer
- Partner: Boomi
Below are the screenshots of my own configuration for both definitions in Mendelson, so you can compare them against your own setup. Local Station
- Type: Local Station
- Name: customer
- ODETTE ID: O2010CUSTOMER
Partner Configuration (Boomi)
- Type: Remote Partner
- Name: boomitest
- ODETTE ID: O1999BOOMIES
- Host: Boomi Atom hostname
- Port: 3305
- Password: set a password (maximum length of 8 characters)
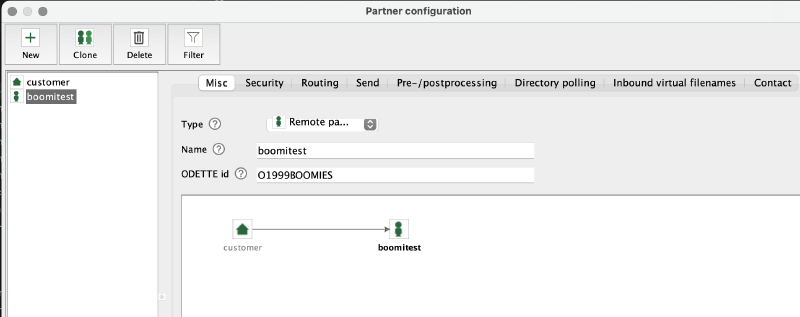
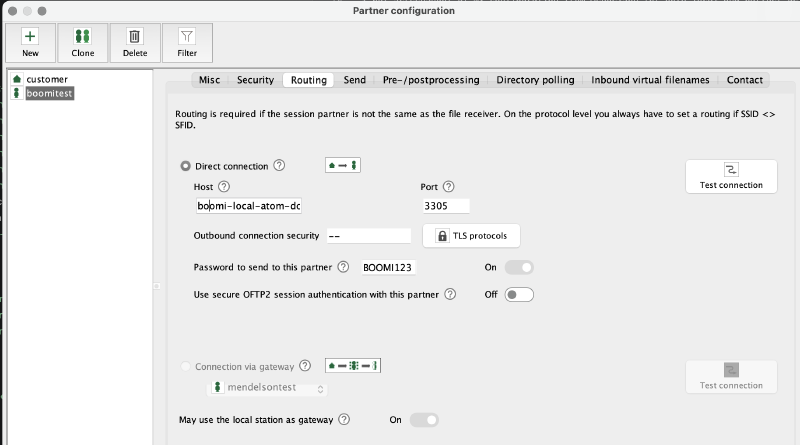
One detail worth highlighting: the OFTP2 password is limited to a maximum of 8 characters, so keep that constraint in mind when setting it up.
Once both definitions are in place, run a test connection from Mendelson. If everything is configured correctly, you should see a window confirming a successful response from Boomi, like the one below.
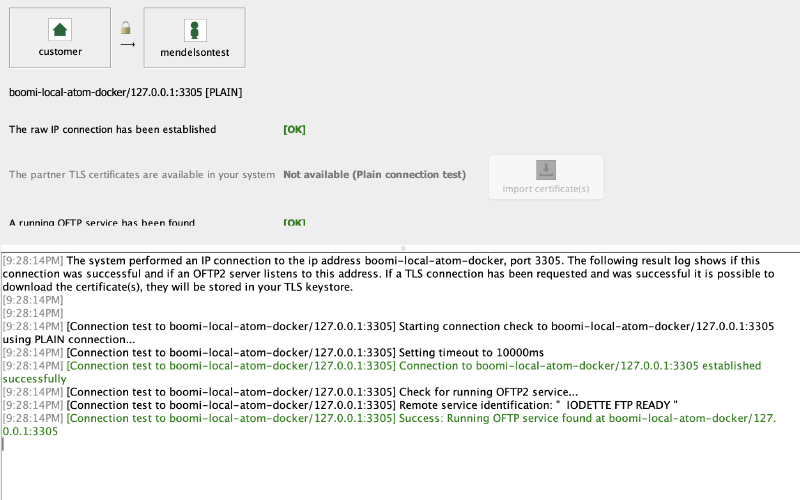
If you run into errors instead, it is usually something on the connectivity side. Double-check the obvious suspects first: firewall rules, the port number, the hostname, and any missing libraries such as BouncyCastle from the earlier step.
Trading Partner Management Configuration #
If you have completed the previous steps correctly, we can now move on to creating the Trading Partner details in Boomi.
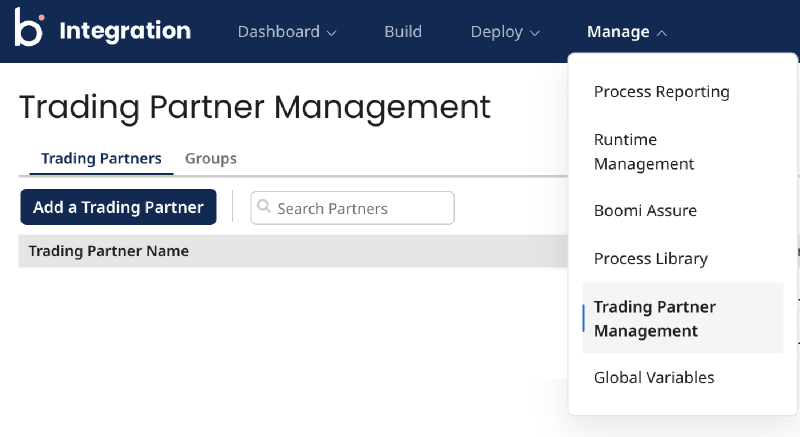
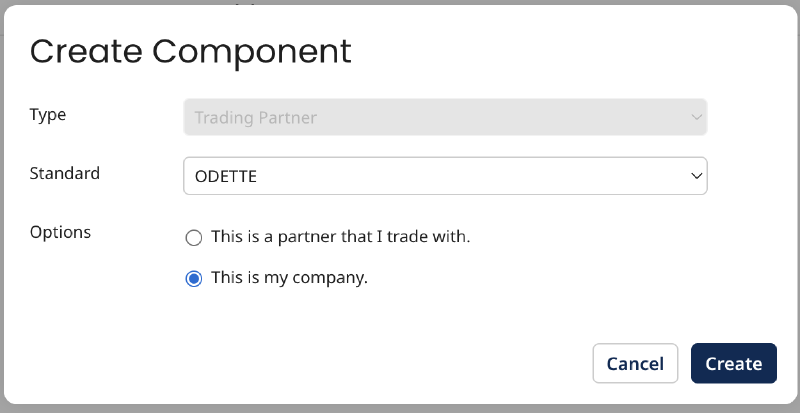
Click the Add a Trading Partner option and fill in the following:
- Type: Trading Partner
- Standard: ODETTE
- Options: This is my company
That last option deserves special attention. It is easy to get confused here because the same relationship is modeled from opposite directions in the two tools. In Boomi, the profile we are creating represents our trading partner, whereas in Mendelson this same entity was defined as the remote partner. Keep this mirrored perspective in mind as you go, since mixing up the two sides is one of the most common sources of misconfiguration.
Once the trading partner is created, we need to fill in a few more details to complete the Boomi connection. For the full reference, see Boomi’s documentation: https://help.boomi.com/docs/Atomsphere/Integration/Process%20building/int-Trading_Partner_ODETTE_Standard_tab_51d64a3e-ac24-427b-9b21-33a9e41ac301
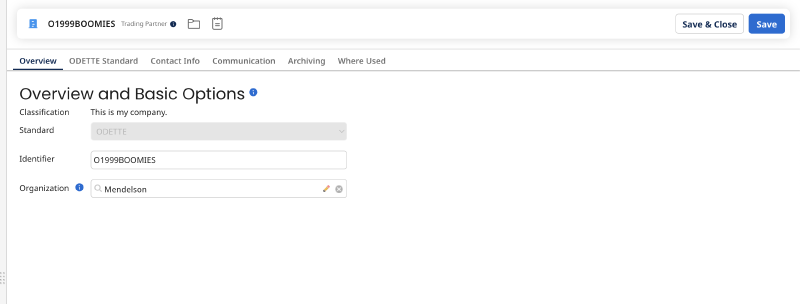
#### Overview
- Identifier: O1999BOOMIES
- Organization: You can either select an existing organization or create a new one. In my case, I will use Mendelson.
ODETTE Standard #
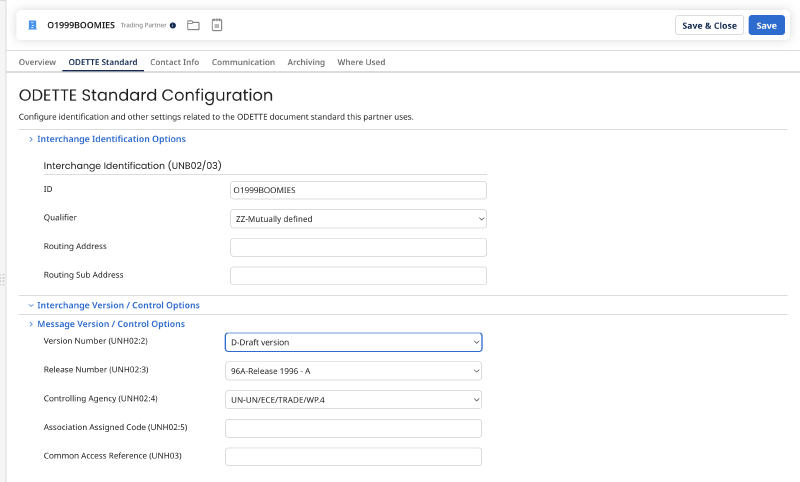
- Interchange Identification Options
- Interchange Identification (UNB02/03)
- ID : O1999BOOMIES
- Qualifier : ZZ
- Interchange Identification (UNB02/03)
- Message Version / Control Options
- Version Number (UNH02:2) : D
- Release Number (UNH02:3) : 96A (I’ll use 96A version edi example)
- Controlling Agency (UNH02:4) : UN-UN/ECE/TRADE/WP.4
Communication #
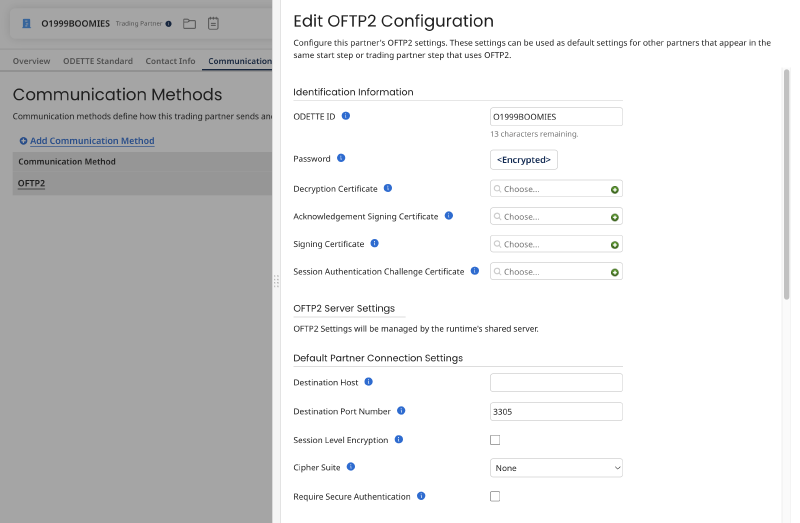
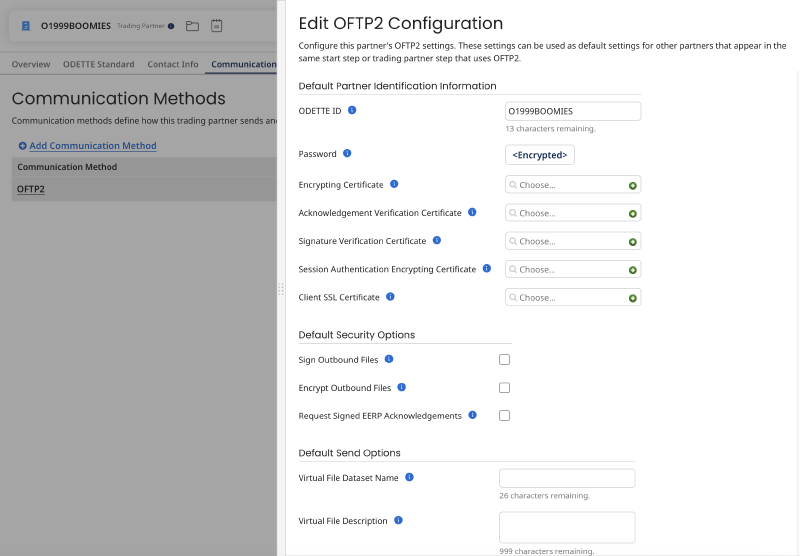
In this tab, set the Communication Method to OFTP2.
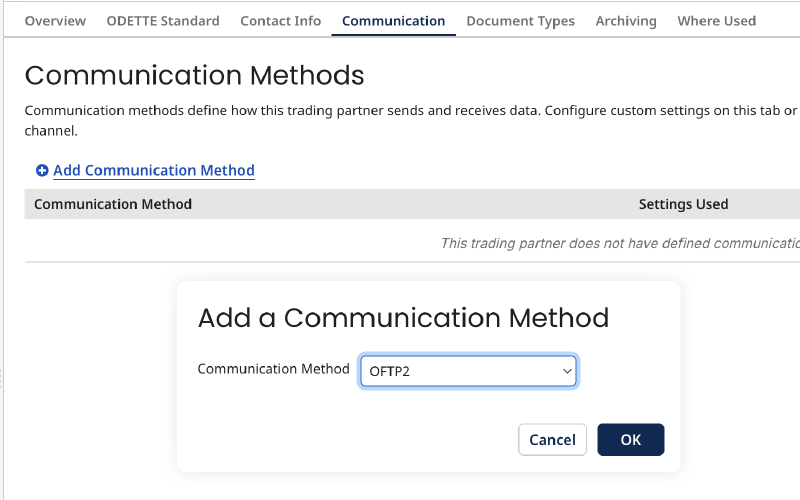
Here we need to provide the Boomi ODETTE ID and password that we defined earlier in Mendelson. These values must match exactly on both sides, otherwise the connection will fail while sending data.
With that, we have our first Trading Partner configured in Boomi.

Now we need another one for customer definition.
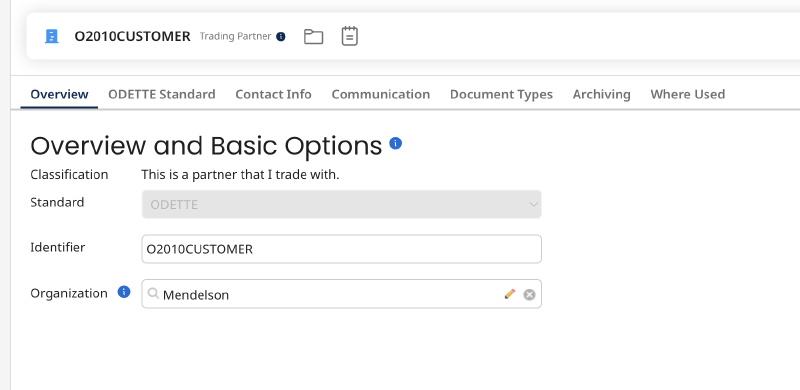
- Identifier: O2010CUSTOMER
- Organization: You can either select an existing organization or create a new one. In my case, I will use Mendelson.
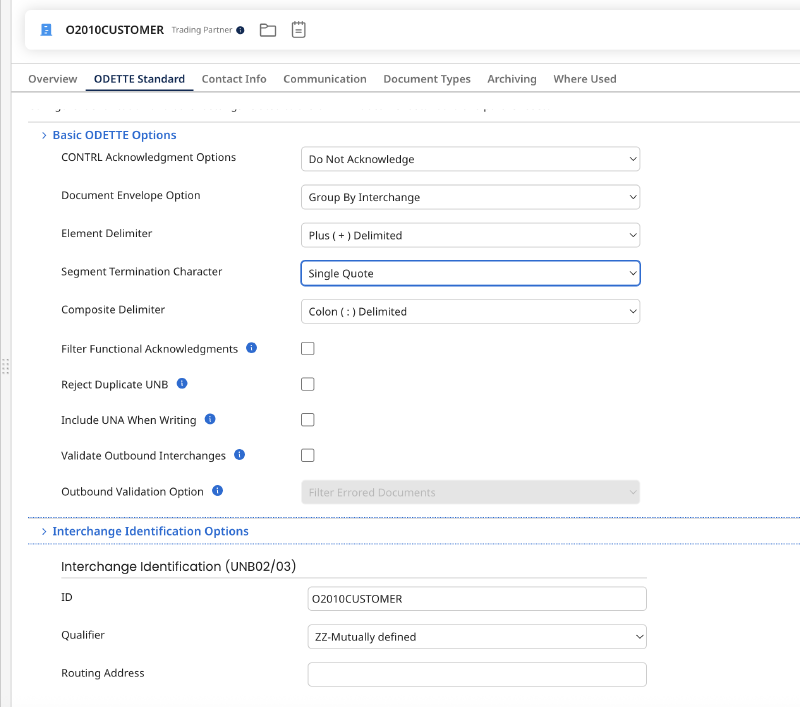
- Basic ODETTE Options
- CONTRL Acknowledgment Options : Do Not Acknowledge
- Document Envelope Option : Group By Interchange
- Element Delimiter : Plus Delimited
- Segment Termination Character : Single Quote
- Composite Delimiter : Colon
- Interchange Identification Options
- Interchange Identification (UNB02/03)
- ID : O1999BOOMIES
- Qualifier : ZZ
- Interchange Identification (UNB02/03)
- Message Version / Control Options
- Version Number (UNH02:2) : D
- Release Number (UNH02:3) : 96A (I’ll use 96A version edi example)
- Controlling Agency (UNH02:4) : UN-UN/ECE/TRADE/WP.4
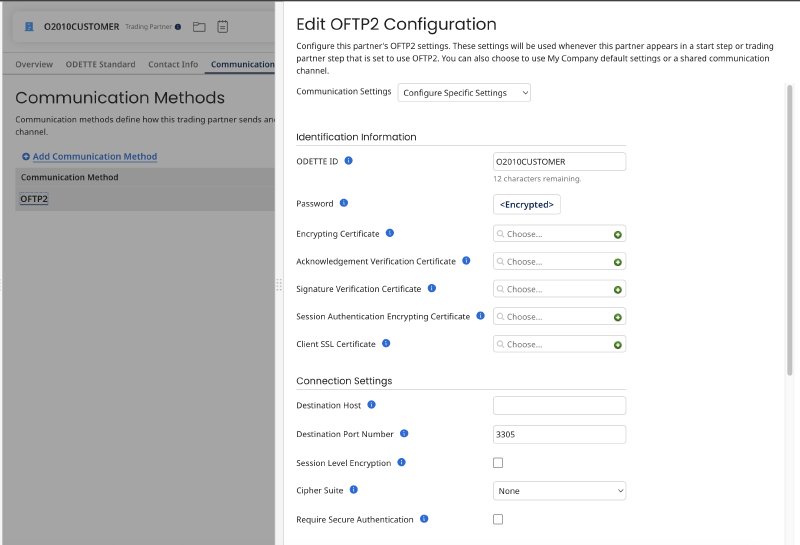
Here we need to provide the Boomi ODETTE ID and password that we defined earlier in Mendelson. These values must match exactly on both sides, otherwise the connection will fail while sending data.
Now we are ready to build a process with these configurations.
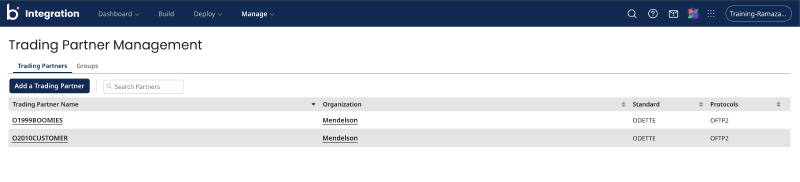
First Integration #
I created a flow with the Trading Partner type. We need to use our definition from the Trading Partner, so we define our Boomi trading partner in the My Standards section.
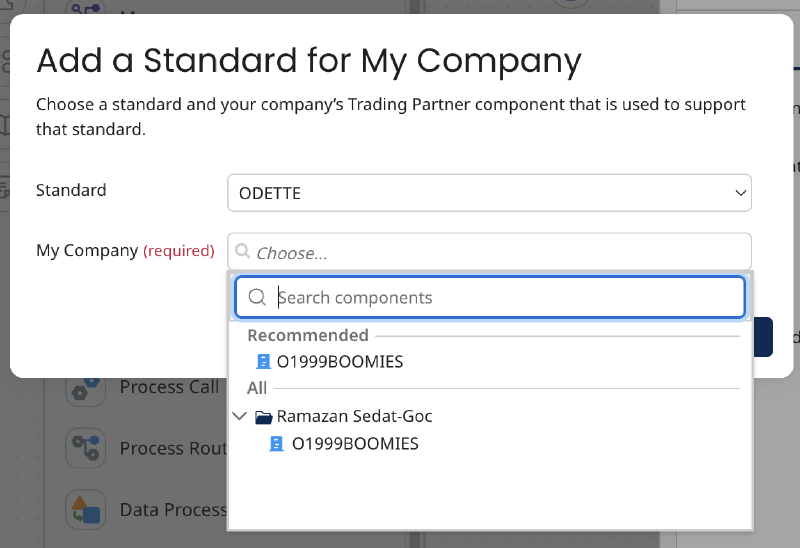
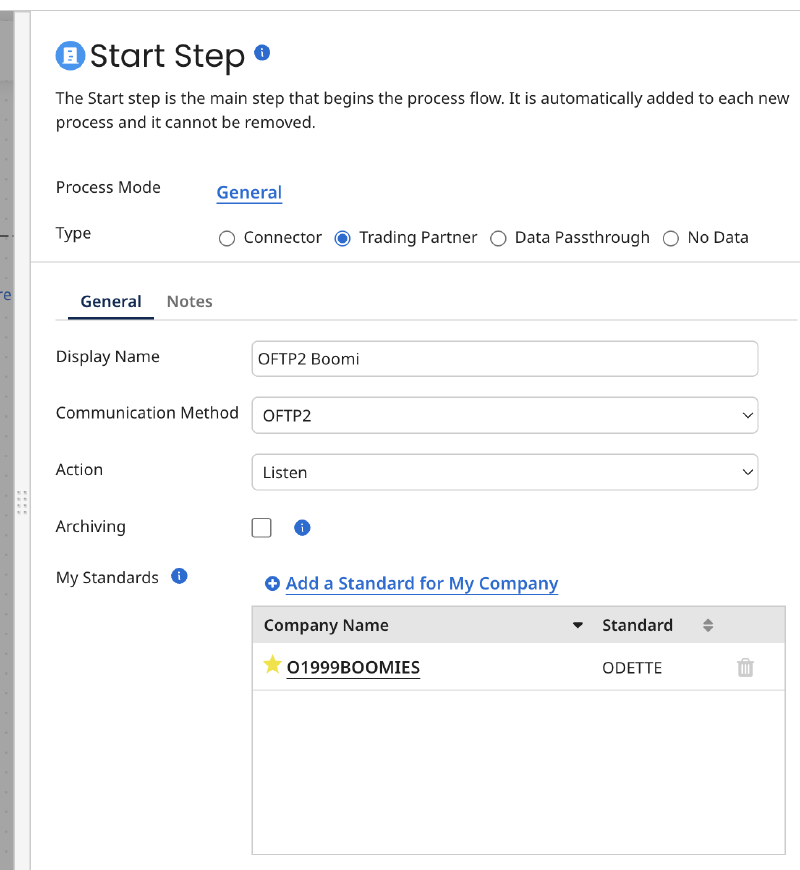
Then we need to do the same thing for the customer trading partner.
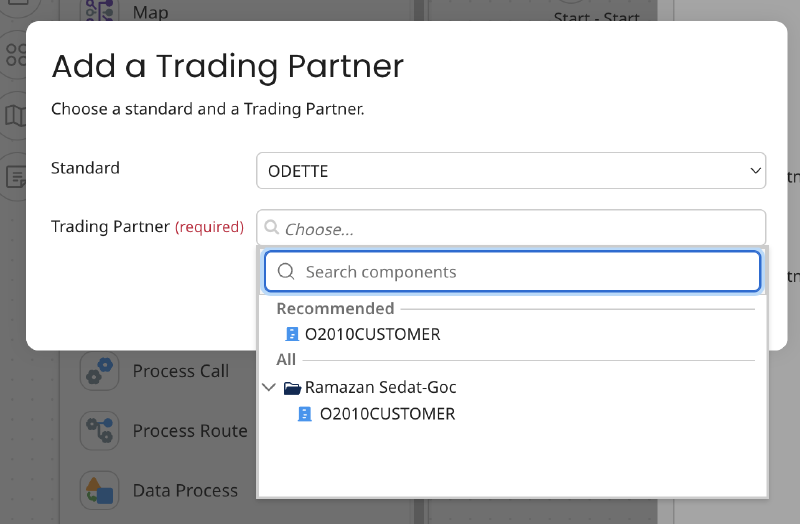
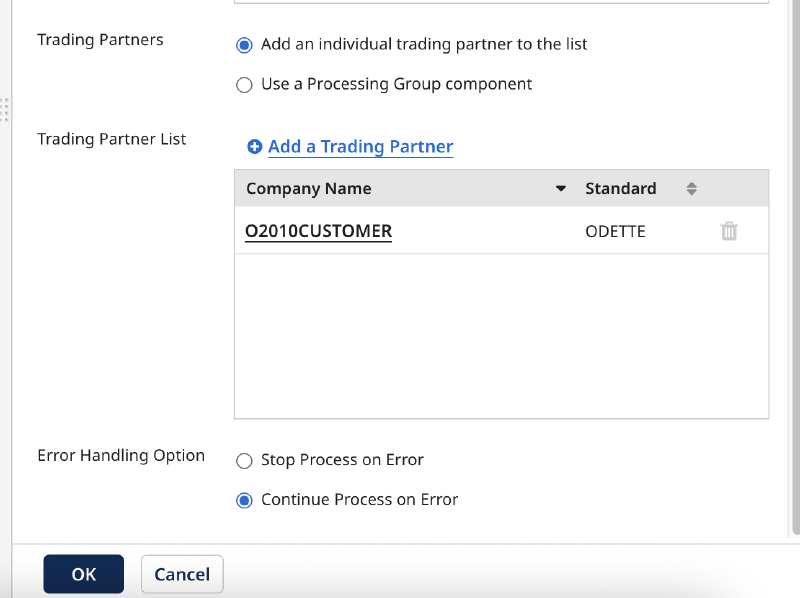
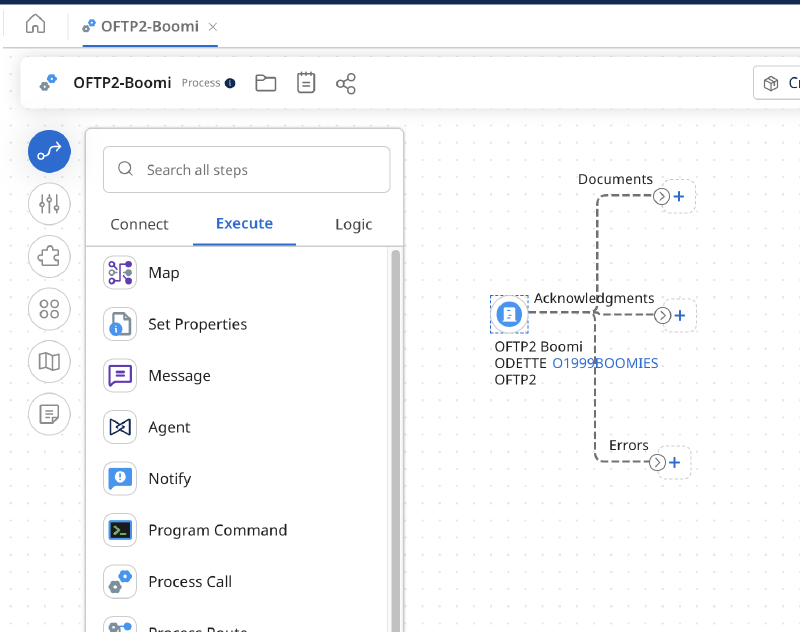
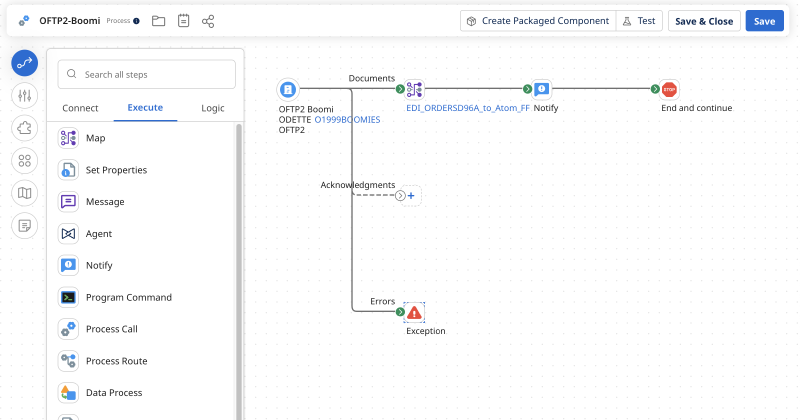
Then click “OK”. The start step is ready. You will see three options, but for now we will only use the Documents and Errors steps.
As I mentioned before, I’ll use the EDI ORDERS D96A example for this integration. You can easily import an EDI profile in Boomi.
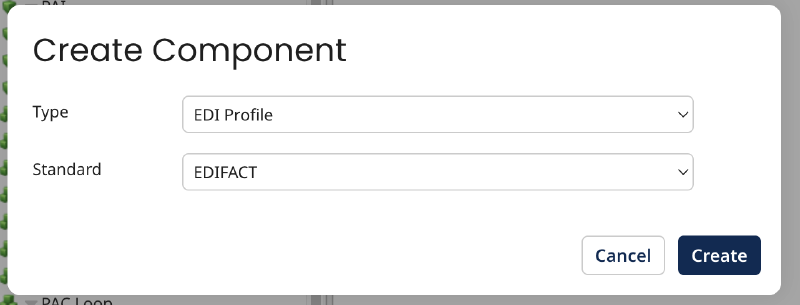
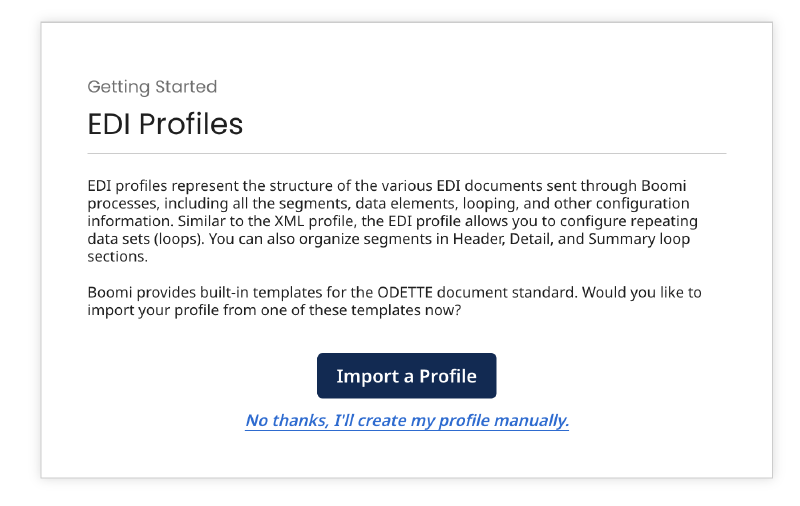
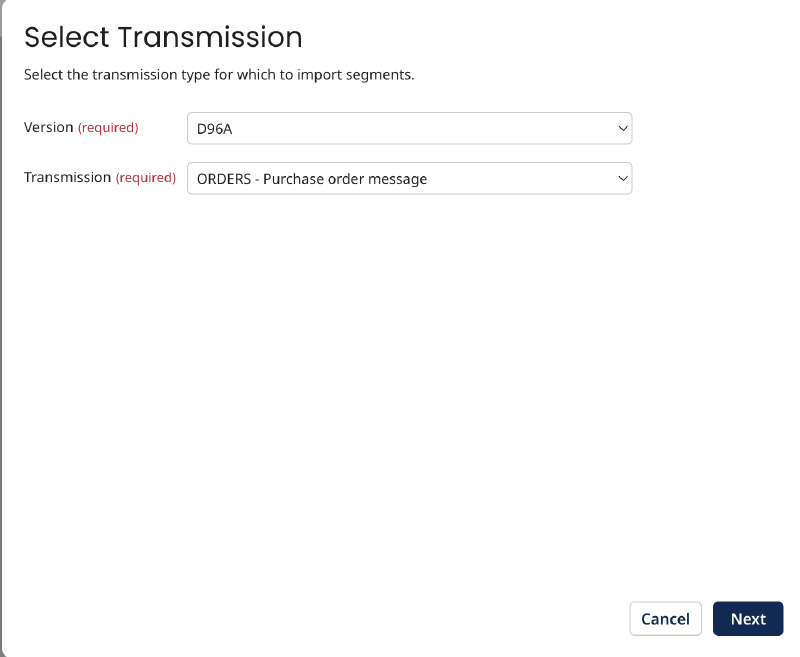
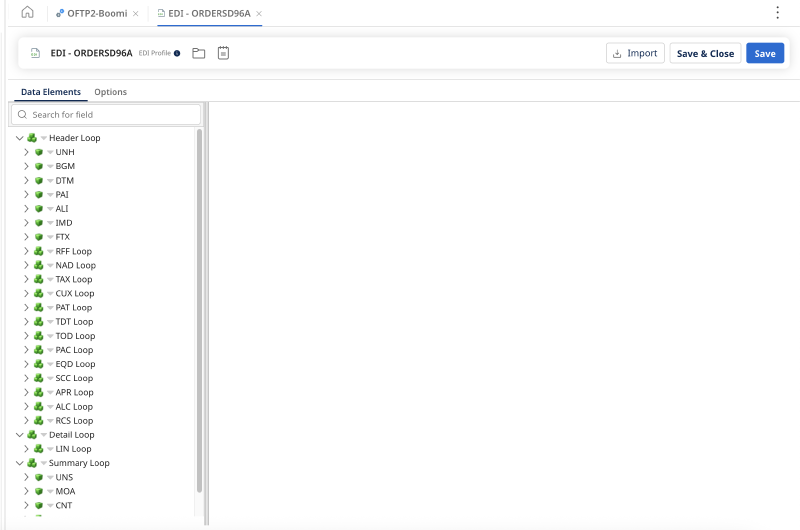
After importing, you will see the imported EDIFACT profile.
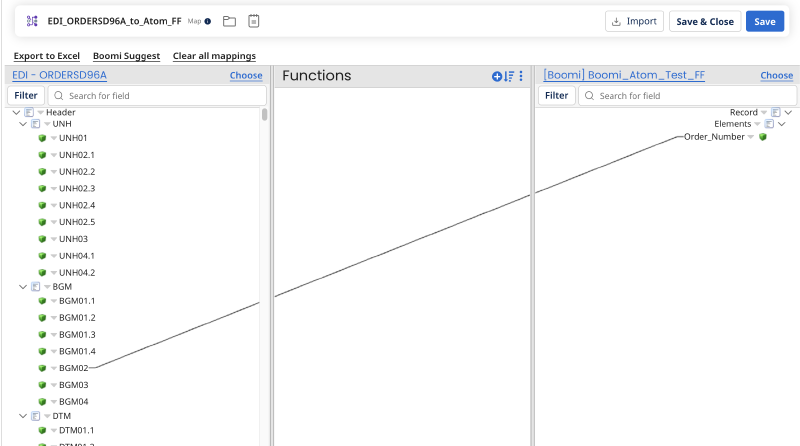
I created really basic mapping with that profile and basic flat file profile and mapped them only with one field.
Then I modified the process like this. I added our map and a notify step to print the mapping output in the logs. In the exception shape, I simply print “Error”.
Processing and Testing the Integration #
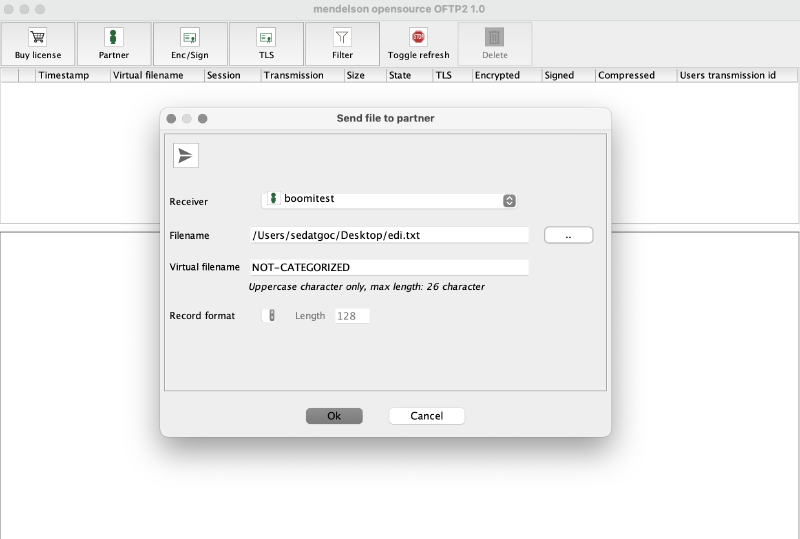
With these configurations in place, our integration flow is completely ready. Now, let’s deploy the process and send our sample EDIFACT data from the Mendelson OFTP2 application to Boomi.
Sample EDIFACT File (ORDERS D96A) #
UNA:+.? '
UNB+UNOA:1+O2010CUSTOMER:ZZ+O1999BOOMIES:ZZ+171129:1512+999'
UNH+1+ORDERS:D:96A:UN'
BGM+220+PO123456+9'
DTM+137:20171129:102'
DTM+63:20171201:102'
DTM+64:20171231:102'
RFF+CR:ABC'
NAD+BY+1234567890123::9'
NAD+SU+9876543210987::9'
NAD+DP+4567890123456::9'
NAD+IV+1230984569876::9++COMPANY+MAIN STREET 1+GERMANY+++DE'
RFF+VA:DE1234567890'
CUX+2:EUR:9'
LIN+1++4123456789012:EN'
QTY+21:10'
PRI+AAA:9.99'
LIN+2++4234567890123:EN'
QTY+21:5'
PRI+AAA:6.66'
UNS+S'
CNT+2:15'
UNT+21+1'
UNZ+1+999'
Trigger the transmission within the Mendelson application to send the file to your local Boomi Atom.
Execution Results #
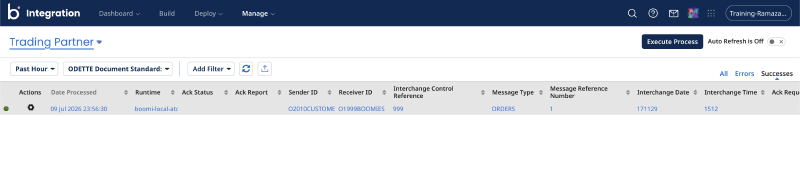
Once the EDIFACT file is successfully transmitted, you will see a successful execution template inside Boomi Process Reporting.

Additionally, if you navigate to Trading Partner Management Reporting, you can track the metadata, interchange details, and specific inbound/outbound statuses of your EDI transaction.
Conclusion #
Setting up B2B integrations in the automotive supply chain doesn’t have to be a multi-week headache of scattered property files and custom scripting. By coupling Boomi’s Trading Partner Management (TPM) framework with native OFTP2 handling, you centralize security certificates, communication configurations, and EDIFACT routing rules into a single, scalable dashboard.
While minor environment hurdles like missing cryptography libraries (BouncyCastle) or strict character limits on OFTP2 passwords can trip you up initially, resolving them at the infrastructure layer sets up a smooth environment for your enterprise. Once your baseline configuration is locked in, onboarding your next twenty trading partners follows the exact same structured pattern—allowing you to focus on business logic rather than connectivity troubleshooting.
If you have questions about configuring specific EDIFACT message versions or handling advanced certificate handshakes within Boomi TPM, feel free to drop a comment below or reach out!